
I remember when I first discovered the power of a great font. It was the late 90’s (that’s the 1900 and 90’s) and I was just starting to get into website design and graphic design. I had been struggling to bring this particular design to life through drawings when it hit me. What the image needed was a better font. I began searching online and found great websites like 1001fonts.com and dafont.com (two of my favorites). I went to town downloading hundreds of fonts, and so began my love of a great font and the power it can bring to great design. I’m not sure which font I ended up using that day, but I am now a man who is completely sold out to the power of fonts.
How Can I Make My Own Font?
Making your own handwriting font is easier than you might think – and there is a REALLY great free version. Before I get into the free version, there is a website that will produce fonts for you called fontifier. Fontifier does an ok job, but the pixel level of scans they ask you for are really not sufficient for anything but smaller fonts, and they charge you $9. I want to tell you about a service that’s free and does a better job (they allow you to upload scanned fonts at a 600px resolution).
What do you need to create your own font?
You really only need a few things to turn your handwriting into a font:
- A printer and paper (you will have to print their template
- A nice pen. Don’t skimp on the pen – get a felt tip pen or something that bleeds just a little bit. This will help your font look crisp and realistic
- A scanner – preferably one that can scan up to 600dpi
- A cup of coffee – you don’t really need it for making your own hand written font, but let’s be honest, you do NEED it!
That’s really it. Now you are ready to create your own handwritten font.
Steps to Create My Own Handwritten Font for Free
- Visit MyScriptFont.com
- Download their template
- Handwrite out each letter, number, and symbol
- Scan your written on template in 600dpi if possible
- Upload your template
- Name your new font and download it
- All that’s left is to install your font on your computer. If you are not sure how to do this, google, “How to install a new font”
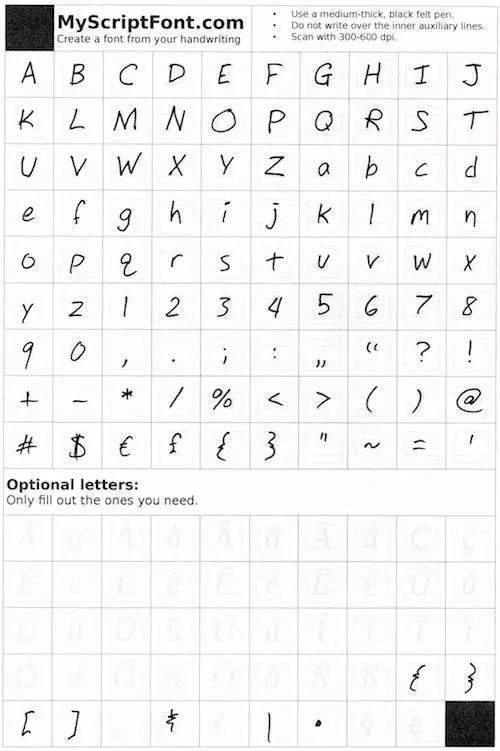
TIP: I found when I first created my font that writing over the grayed out letters in their template ended up cutting off the bottom of my “g”, “j”, and “q”. The next time I did it, I made my letters a little smaller and moved my baseline up a little bit and it the issue. Also, the first quote mark they show lined up with the baseline and the second one lined like a normal quote “. I followed their example and ended up with the front quote of everything I wrote showing up at the bottom of the words and the quote mark that followed showing up in the normal position. Don’t do what I did. Make both quote marks positioned like you normally would.
This is the Right One – Notice the Quotation Mark I wish I had fixed (it follows the “:”). I ended up having to use a website called Glyphr Studio to fix this mistake.

That’s all it takes to create your own handwritten font! Enjoy!